Friday, May 14, 2010

Baby Shower Tag

How can you attend a Baby Shower without a tag on your gift?!

My MIL dropped off a gift at my house without a tag, gasp!
So I made one for her gift, and one for my gift.

Pretty simple:
  1. Brown card stock with pink paisley patterned paper (wow say that 10 times fast).
  2. I cut a matching paisley from some of the left over paper
  3. Added pink hot foil dots around the outside, and purple hot foil dots in the inside - I'll do a tutorial on that later.
  4. Then added double stick tape and plopped it right on top of the existing paisley on the paper.
  5. little rub on sentiment from of the dollar tree, two mini hole punches on top, and ribbon to tie it off.

Inside:
  1. A smaller size pink square - because writing on brown doesn't show up very well.
  2. Cut out another paisley from the scrap paper
  3. Inked all edges for added interest.
For the MIL tag..

  1. A simple small tag shape cut out of pink card stock. This is cut long than folded over to open.
  2. Pink and Green patterned paper
  3. A little green ribbon
  4. light pink button - attached by a glue dot.
  5. That pink brad and thingy that holds the tag closed. The brad goes through the ribbon on the back.

Now our gifts have tags.

I'm slower at updating my Card Making blog..Please Follow me here:

Sunday, March 7, 2010

How to Make a Roman Solider or Centurion Costume

At church we participated in a small dramatization of the Savior's life. I was asked to provide the costume for the Roman Centurion present at Christ's Crucifixion. (Mark 15:39)


I decided to give it a try 'on the cheap'.


First I gathered my materials:
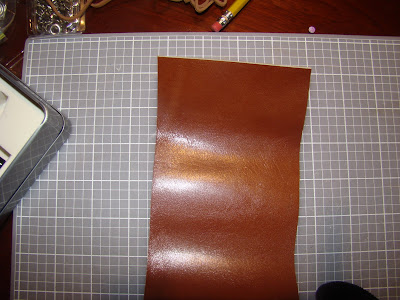
1.5 yards of broadcloth in neutral color - tunic
1 yard red soft velvet like fabric - cape
Scraps of leather - belt, cape, and sword handle
Metal medallions - decorative on leather and helmet
Red feather package - plume
Cardboard, newspaper, spray paint - shield and helmet


Here's what I came up with, a new sew few day project.


I actually used my card making tools to pull this one off!


I cut my scraps of leather into long strips with my rotary cutter on a self-healing mat.


Then I used my eyelet hole punch and setter to make holes in the belt...


It sliced through the leather with no problem - then I knew this would be fun!


After setting eyelets (the regular kind for paper crafts) on the belt I laced it together so it would be adjustable and snug.


It looks pretty cool too! (Shown: toddler version)


I then attached additional strips of leather to the front of the belt with an brad (from the office supply store) through the metal medallion. So that the other strips would hang from the belt.


Here's an up close view of the Belt: toddler version...


Notice that each strip was cut with a point at each end. And that the toddler version has three strips and the adult version has five. I also added a circle of leather behind the middle medallion to give it a bit more detail...


The helmet and shield was made from paper-mache. A balloon inflated to fit inside the wears baseball cap. The paper-mached to create the form (took 2 days to dry) trimmed to shape, and cardboard decorative pieces to front and top. Then spray painted silver. I added the feathers in between the corrugated parts of the card board then fit nice and tight. Then added another medallion to tie it all together.


The shield was the cardboard piece that comes from the bottom of the freschetta frozen pizza!

I taped another round cardboard on top of that and then a paper plate for dimension: Paper mach ed the whole thing and again with the spray paint. On the back I just made loops for the arm with duck tape.


The Sword was made from a yard stake. I sawed the end off and nailed it as the cross piece. Then spray painted the end and wrapped the handle with leather. Some of the children thought it was real!


I also made an arm cuff with more leather scraps - I added some snaps.


I found the fabric, medallions ($.10 a piece) and GENUINE LEATHER (by the pound) at SAS fabric all for really cheap!

The feathers and brads at Michael's

And spray paint at Lowe's.

Now you know how to make this costume or just borrow mine!


Thursday, February 11, 2010

Easy Valentine's Day Gift Wrapping

Happy Valentine's Day...

I love using wrapping paper to make coordinating tags. I especially like this gift because their was no waste! I used that extra piece of wrapping paper left after cutting it to the size of your gift, as the horizontal stripe and tag. I just used plain off-white paper behind it, tied with twine.
The best part is I bought the wrapping paper at the after CHRISTMAS sale for 90% off. That means the whole roll cost me $.29! Just thought I'd share that deal..
Total cost of wrapping this gift: $.10

A pattern, A solid, Ribbon, & stickers

The basics for card making:
Card stock base, a patterned piece of paper, and solid piece of paper, some ribbon, and stickers...
I found this alphabet 12 x 12 paper in my stash and I just decided to work with it...
I only used 1 piece of patterned and 1 piece of solid (not including the card bases).

Simple is always good. The bird sticker's image is strong enough to detract from the busy alphabet background.

I found this one harder to balance, enough pattern to solid -
I still think I need something next to the butterfly...


This was the first one I made..
I thought I was being clever cutting out the letters I needed to spell "THANKS".


A few easy tags with the left overs...


A few more tags with walnut spray..
I'm not very good with this stuff yet! It just looks dirty to me.


Making a simple Tag

I can't imagine anyone being intimidated by making a tag. But if you're one of them let me give you a quick and easy tag to start with....
In this case I started with a pre-made flimsy tag. Cut a scrap of coordinating brown card stock, cut a smaller square of white card stock - glued those two pieces together and punched a hole at the top. (The white paper is for the back to write to: and from: on) Found some 'matching' ribbon and double stick foam tape.

I'm cheap remember so I cut the foam dots in half and adhered them to either side of the pre-made tag. Flipped the brown card stock over to the front side and lined up the holes, centered, adhered. Then added the ribbon..


There you have it..a simple fast and easy tag.


Cost: Stash (scraps from it)


Thursday, January 28, 2010

One Piece of Paper Card

This paper has many different patterns and is two sided. So I can make lots of things with it. This is one card I made while watching the kids do their homework...

Started with a 12 x 12 Making Memories Paper, cut to size. Then took the left over and cut out a heart freehand, teal green on backside or pattern. Attached with staples.


Even more left over paper free handed another heart and crinkled it up. Added a button for some charm and attached with glue dot.

Double-sided paper is fun - you can see the teal green when card is opened.


Sanded edges (should've done that first). All finished.


More left over paper made a tag with same technique, but added walnut spray to antique it.


Total for one card and tag:
$.14